ToDo Sample
The ToDo sample demonstrates how to create a minimal real-time application using Cognibase. It is a simple ToDo / Tasking application. It has just a simple Entity, the ToDoItem, so as to be as simple as possible.
Download or clone the samples from GitHub samples repository.
The ToDo app UI follows mostly the corresponding Avalonia UI sample found in Avalonia samples page. However, for simplicity and clarity reasons, it doesn't strictly follow the MVVM pattern and conventions.
Quick Start
-
Open Todo.sln solution in Visual Studio
-
Build the solution
-
Run or Debug the TodoServer
-
Run or Debug two instances of the ToDoApp
-
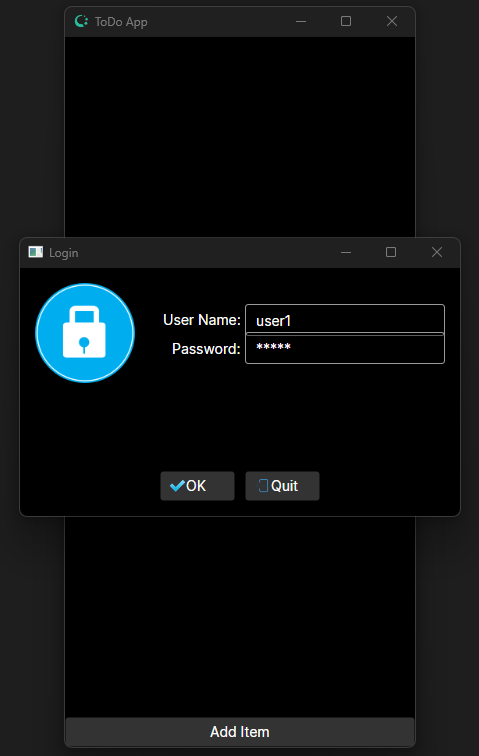
To login use one of the pre-configured users that are in the app.config of the server (those accounts are there only for initialization, they are stored in db). You can use the same user in more than one instances. Note: the user credentials are hardcoded to the Desktop App for simplicity.
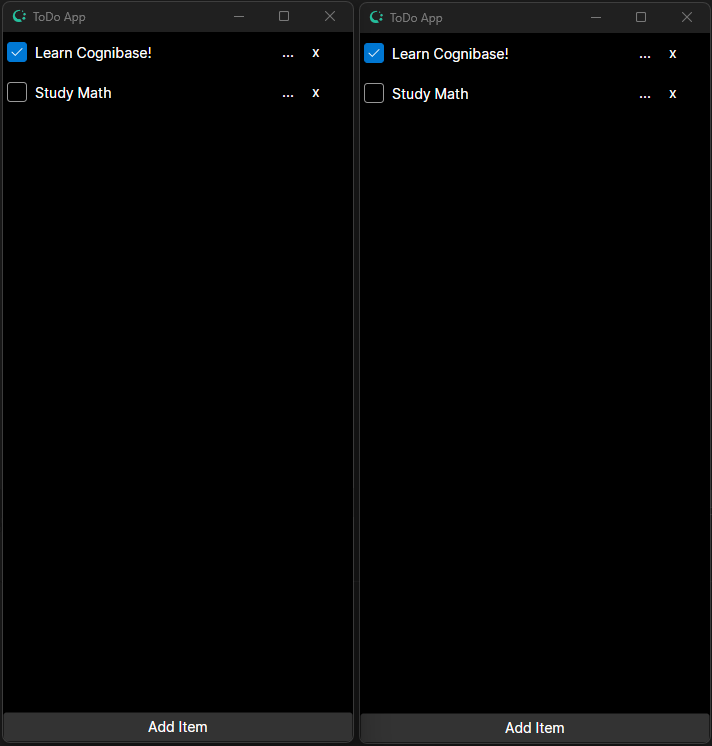
- After login you can add a Todo item. Click the Add Item button and enter some text. Then click OK. This will be immediately shown to the other instance. Then add another item.

- Click the checkbox of an item and see that it is immediately synchronized to the other running instance.
ToDo Codebase
The ToDo sample consists of the following projects:
- ToDoDomain: The Domain (Entity Model) of the application.
- ToDoServer: The Cognibase Object Server.
- ToDoApp: The Desktop application built with Avalonia UI and RactiveUI.
ToDo Domain
In the ToDo Domain project there are two folders:
- Entities: Where the entities reside.
- System: Where two classes exits that make this assembly be treated as Domain from Cognibase (see more here)
The Chat Domain contains the following Entities.
The ToDo Domain consists of only one Entity the ToDoItem.
[PersistedClass]
public class ToDoItem : DataItem
{
    [PersistedProperty(IdOrder = 1, AutoValue = AutoValue.Identity)]
    public long Id { get => getter<long>(); set => setter(value); }

    [PersistedProperty]
    public string Description { get => getter<string>(); set => setter(value); }

    [PersistedProperty]
    public bool IsChecked { get => getter<bool>(); set => setter(value); }
}
For the C# project to be considered a Cognibase Domain it has to have a factory class and an Assembly Attribute.
In TodoFactory class there is a minimal implementation of the domain factory:
public class TodoFactory : DataItemDomainFactory
{
    // Return DOMAIN Assembly
    protected override Assembly getFactoryAssembly() { return GetType().Assembly; }

    // Return DOMAIN Description
    protected override string getDomainDescription() { return "This is the ToDo Domain"; }
}
In the DomainInfo class there is only the below line that provides few metadata to the Cognibase runtime.
[assembly: Missionware.Cognibase.Library.RuntimeDomain(
    DomainName = "TodoDomain", DomainShortCode = "TODO", SecurityEnabled = false)]
ToDo Server
The ToDo Server project uses the (default) SQLite adapter and references the ToDo domain. It also contains a few lines to bootstrap the Cognibase Object Server.
Below is the Program.cs:
[MTAThread]
private static void Main(string[] args)
{
    // enable Serilog
    LogManager.RegisterAgentType<SerilogAgent>();

    // start the object server
    ServerManager.StartInConsole();
}
Also in the app.config file there is the the definition of the ToDo Domain in the DataStore element.
ToDo Desktop App
The ToDo Desktop app contains the business logic and the user interface. It uses the Avalonia UI and ReactiveUI frameworks and is inspired by the sample found in Avalonia samples page.
The ToDo app has two views:
- The main view that shows the ToDo items and
- The ToDo item edit view
Also, during startup the login popup appears so as the Cognibase Client Object Manager will connect to the Object Server. The login username/password are hardcoded for quick testing (but you can omit the hardcoded credentials).
The bootstrap code is written in the MainWindow.axaml.cs class. During the opening of the Window, it uses the component AvaloniaStartupHelper that provides ready to use components for login and initialization. This component shows the standard Avalonia login popup and performs the login. It also offers two delegates, a Quit action delegate that is used normally to terminate the app and a load action that is used to execute after login to perform the initial reading of a DataItemCollection (Live Collection) of all ToDo items.
protected override async void OnOpened(EventArgs e)
{
    // call base
    base.OnOpened(e);

    // create startup helper
    _startupHelper = new AvaloniaStartupHelper(this, App.Client);

    // create a new Auth dialog view model that will be used by the standard Avalonia login window and
    // setting the domain and hardcoded username/password (only for simplicity)
    _startupHelper.AuthVm = new SimpleAuthDialogVm
    {
        DomainFullName = "Basic", Username = "user1", Password = "user1"
    };

    // set the quit and data load delegates
    _startupHelper.QuitAction = () => Close();
    _startupHelper.DataLoadAction = () =>
    {
        // read devices
        DataItemCollection<ToDoItem> collection = App.Client.ReadDataItemCollection<ToDoItem>();

        // set data source in main thread
        Dispatcher.UIThread.Invoke(() =>
        {
            _vm.ListItems = App.Client.ReadDataItemCollection<ToDoItem>();
            mainView.DataContext = _vm;
        });
    };

    // show the auth dialog window
    await _startupHelper.ShowAuthDialog().ConfigureAwait(false);
}
The MainWindow.axaml.cs class contains also the navigation to the edit form.
public async Task OpenAddEditItemView(ToDoItem item)
{
    // create the edit view View Model
    var itemVm = new TodoItemEditVm(App.Client, item, _dialog);

    // create the Edit View
    var itemView = new TodoEditView();

    // set the cancel action to be the navigation back to the main view
    itemVm.CancelAction = () => Content = mainView;

    // set the Data Context to the viewmodel
    itemView.DataContext = itemVm;

    // navigate to the edit view
    Content = itemView;
}
ToDo Main View
The main view shows the ToDo items and someone can:
- Add an item by clicking the Add Item button and navigating to the
ToDoEditView. - Edit an item by clicking the 3 dots "..." button and navigating to the
ToDoEditView. - Delete an item by clicking the "x" button
- Check the checkbox to imply that the item is Done
Except of the navigation to the edit view for adding/editing ToDo items the main view handles in its ViewModel the deletion and the Checking of items.
The xaml of MainView.axaml is shows below:
 <DockPanel>
     <Button DockPanel.Dock="Bottom"
             HorizontalAlignment="Stretch"
             HorizontalContentAlignment="Center"
             Command="{Binding $parent[Window].AddEditItemCommand}">
         Add Item
     </Button>
     <ScrollViewer VerticalScrollBarVisibility="Visible">
         <ItemsControl ItemsSource="{Binding ListItems}">
             <ItemsControl.ItemTemplate>
                 <DataTemplate>
                     <Grid ColumnDefinitions="*,30, 50">
                         <CheckBox Margin="4" Grid.Column="0"
                                   IsChecked="{Binding IsChecked}"
                                   Content="{Binding Description}"
                                   Command="{Binding $parent[ItemsControl].DataContext.WriteItemCheckCommand}"
                                   CommandParameter="{Binding}" />
                         <Button Grid.Column="1" Background="Transparent"
                                 Command="{Binding $parent[Window].AddEditItemCommand}"
                                 CommandParameter="{Binding}" HorizontalAlignment="Left"
                                 HorizontalContentAlignment="Left">
                             ...
                         </Button>
                         <Button Grid.Column="2" Background="Transparent"
                                 Command="{Binding $parent[ItemsControl].DataContext.DeleteItemCommand}"
                                 CommandParameter="{Binding}" HorizontalAlignment="Left"
                                 HorizontalContentAlignment="Left">
                             x
                         </Button>
                     </Grid>
                 </DataTemplate>
             </ItemsControl.ItemTemplate>
         </ItemsControl>
     </ScrollViewer>
 </DockPanel>
The code of the ViewModel in MainViewModel.cs contains the bound properties and the commands:
// ....

// The live collection of the ToDo items bound to the view
 public DataItemCollection<ToDoItem> ListItems { get; set; }

 // The Check command bound to each item
 public ReactiveCommand<ToDoItem, Unit> WriteItemCheckCommand { get; }

 // The Delete command bound to each item
 public ReactiveCommand<ToDoItem, Unit> DeleteItemCommand { get; }

// ....

private async Task WriteItemCheck(ToDoItem item)
{
    // check the item is not null
    if(item != null)
    {
        // save
        var SaveResult = await _client.SaveAsync(item);

        // if fail reset edits and notify user for the failure
        if (!SaveResult.WasSuccessfull)
        {
            // reset all edits
            _client.ResetAllMonitoredItems();

            // notify
            await _dialogService.ShowError("Error", "Could not save data. Try again or cancel edit.");
        }
    }
}

private async Task DeleteItem(ToDoItem item)
{
    // check the item is not null
    if (item != null)
    {
        // confirm deletion
        AsyncDialogResult result = await _dialogService.AskConfirmation("Delete Item?",
            $"Do you want to Proceed?");
        if (result == AsyncDialogResult.NotConfirmed)
            return;

        // mark for deletion
        item.MarkForDeletion();

        // save
        ClientTxnInfo saveResult = await _client.SaveAsync(item);

        // if not success unmark and notify user for the failure
        if (!saveResult.WasSuccessfull)
        {
            // unmark (reset edit)
            item.UnMarkForDeletion();

            // notify
            await _dialogService.ShowError("Error", "Could not delete Item.");
        }
    }
}
ToDo Edit View
The ToDo edit view handles the creation and edit of ToDo items. Here is the View code in TodoEditView.axaml:
<DockPanel>
    <Button DockPanel.Dock="Bottom"
            HorizontalAlignment="Stretch"
            HorizontalContentAlignment="Center"
            Command="{Binding CancelCommand}">
        Cancel
    </Button>
    <Button DockPanel.Dock="Bottom"
            HorizontalAlignment="Stretch"
            HorizontalContentAlignment="Center"
            Command="{Binding SaveCommand}">
        OK
    </Button>
    <TextBox AcceptsReturn="True"
                Text="{Binding Item.Description}"
                Watermark="Enter your to do item" />
</DockPanel>
In the constructor of the View Model TodoItemEditVm.cs we detect if it is an addition or edit and we create a new data item if needed.
// .....

// The item instance whose properties are bound to the view
public ToDoItem Item { get; set; }

// The UI action that will be performed when cancel is clicked
public Action CancelAction { get; set; }

// The Save item command
public ReactiveCommand<Unit, Unit> SaveCommand { get; }

// The Cancel edit command
public ReactiveCommand<Unit, Unit> CancelCommand { get; }

public TodoItemEditVm(IClient client, ToDoItem item, IAsyncDialogService dialogService)
{
    // set
    _client = client;
    _dialogService = dialogService;

    // set the command
    SaveCommand = ReactiveCommand.CreateFromTask( o => Save());
    CancelCommand = ReactiveCommand.CreateFromTask(o => Cancel());
    Item = item;

    // if item parameter is null then it means that it is a creation action so create a new item
    if (Item == null)
        Item = _client.CreateDataItem<ToDoItem>();
}

private async Task Cancel()
{
    // check changed
    if (Item != null && Item.IsChanged)
    {
        // if cancel reset edits
        _client.ResetAllMonitoredItems();

        // just clear
        Item = null;
    }

    // close the view (navigate back to main view)
    CancelAction();
}

private async Task Save()
{
    // save
    var saveResult = await _client.SaveAsync(Item);

    // if success close form
    if (saveResult.WasSuccessfull)
        CancelAction();
    else // else show message
        await _dialogService.ShowError("Error", "Could not save data. Try again or cancel edit.");
}